Getting started
Obtain your Public Key
First, you'll need a Public Key for your Concierge account. Each Public Key is tied to a request origin and environment.
The Origin request header indicates where a fetch originates from, e.g. yoursite.com.
If you plan to use the Concierge API from different origins (e.g. staging.yoursite.com and www.yoursite.com), you'll need a separate Public Key for each origin.
How to obtain a Public Key
Ask your Account Manager or email service@conciergeteam.co.
Back in stock
Concierge enables back in stock notifications via SMS that works with Back in Stock or Klaviyo Back in Stock.
How it works
If your customer requests a Back in Stock SMS notification, Concierge will:
1) Send a registration confirmation to the customer
{org_name}: Thanks for signing up to be notified when{product_label}is back in stock. Reply STOP to cancel.
2) Once the product is back in inventory, we will notify the customer via SMS:
{org_name}:{product_label}is back in stock
There is a request limit set to 1 request per day per phone_number - variant_id
We provide different ways to access our backinstock functionality
- 1) Javascript API: Pure Javascript API.
- 2) API Endpoint: HTTP API Endpoint
- 3) React Component: React plug-n-play component ready to be used on your React project.
Prerequisites
In order to create the integration with Klaviyo or Back In Stock we require a corresponding API Key.
Javascript API
Use this low-level function if you are not using a high-level Javascript framework (e.g React, Vue, Angular) or if you want to keep your JS footprint small. This is a pure JS function which doesn't require any external library to work.
Setup
Include the Concierge JS bundle script into your website's main template so it will be added on every page.
<script async type="text/javascript" src="https://concierge-js-bundle.web.app/concierge-js-bundle.js"></script>If you are using Shopify, include it on your file.template.liquid
This will create the
CONCIERGEJS top scope namespace where our API functions will be allocated
Function signature
The back in stock function accepts two parameters.
CONCIERGE.backInStockNotification(OPTIONS, onSuccess);OPTIONS: Configuration options object, See below for accepted list.
OPTIONS
Name Description apiKey Your public API Key. This one changes depending if your are on test or prod mode url The URL where will be posting the data to. Valid values see below for QA and PROD URLS infoElement Id for your html element where the resulting information will be placed. formId ID of the form you are using to submit the data platform backinstock or klaviyo productNo Product number productLink Product link. This should be the full link used to access your product productTitle Product title. shopifyDomain Your shop shopify domain variantNo The product variant number/id variantTitle The product variant title
onSuccess: callback function which will be called after execution.
REST API
The same functionality provided by our JS API can be achieved by using our API endpoints directly.
You need to adjust your PK depending your environment QA/Test mode
POST https://staging.conciergeteam.co/sms_backinstockProduction
POST https://app.conciergeteam.co/sms_backinstockParameters
Name Description pk Your Public Key. Changes depending on test or prod mode url The URL where you will be posting the data to. Valid values see below for QA and PROD URLS phone_number A valid US phone number product_no Product number link Product link. This should be the full link used to access your product product_title Product title. shopify_domain Your shop's Shopify domain variant_no The product variant number/id variant_title The product variant title
React
If you are using React already or want to build something quickly, you can use our Back in Stock plug-and-play React component.
Setup
Install our react concierge sms package from NPM:
Install package
npm install react-concierge-sms
Include the component
import { ConciergeBackinStockForm } from 'react-concierge-sms'
Back in stock form
The react component expose the following api:
<ConciergeBackinStockForm options={options} configuration={configuration}/>
options
Name Description pk Your Public Key. Changes depending on test or prod mode mode dev, test or prod. prod is used by default product_no Product number link Product link. This should be the full link used to access your product product_title Product title. shopify_domain Your shop's Shopify domain variant_no The product variant number/id variant_title The product variant title
All options are required, with exception of mode and platform.
Platform will default to backinstock
Mode will default to prod (valid values are prod, test & dev)
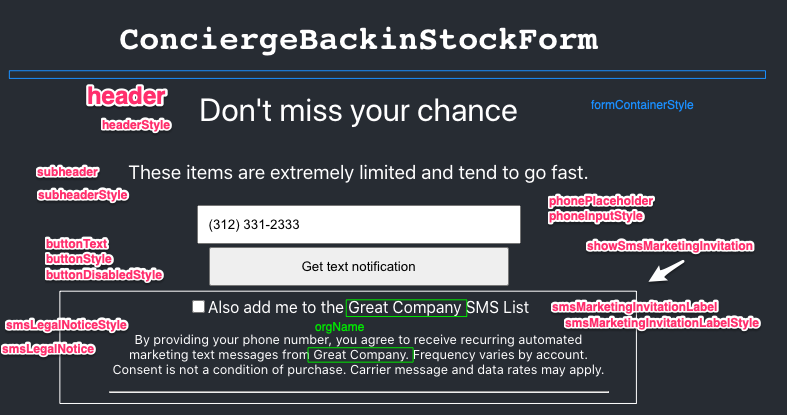
configurationorgName: *required*, header: "Don't miss your chance", successText: "Thank you. We'll send you a message when this item is back in stock.", subheader: "These items are extremely limited and tend to go fast.", phonePlaceholder: 'Enter your phone number', buttonText: 'Get text notification', formContainerStyle: {textAlign: 'center', fontFamily: 'Helvetica'}, buttonStyle: {padding: '10px', width: '60%'}, buttonDisabledStyle: {opacity: 0.7, padding: '10px', width: '60%', cursor: 'not-allowed'}, headerStyle: {fontSize: "2rem"}, subheaderStyle: {fontSize: "1.2rem"}, phoneInputStyle: {padding: '10px', width: '60%'}, showSmsMarketingInvitation: true, smsMarketingInvitationLabel: 'Also add me to the {{org_name}} SMS List', smsLegalNoticeStyle: {fontSize: "0.8rem"}, smsLegalNotice: "By providing your phone number, you agree to receive recurring automated marketing text messages from {{org_name}}. Frequency varies by account. Consent is not a condition of purchase. Carrier message and data rates may apply.", onSuccess: () => {}, onError: (error) => {console.error(error)},
This is the default configuration used, we can overwrite any existing configuration by just passing an attribute with the same name on the configuration object. For those attributes referring to an element style (e.g buttonStyle) you can pass any value accepted for React's style
Configurable elements
Styles names should be specified with an object whose key is the camelCased version of the style name
orgName is required. Make sure to update it with your organization name.
Basic use
options = {
    apiKey: 'YOUR_PUBLIC_KEY',
    productNo: 11,
    productLink: 'https://yourstore.com/the-product',
    productTitle: 'The Product',
    platform: 'klaviyo',
    shopifyDomain: 'succulentcity.myshopify.com',
    variantNo: 'variant no',
    variantTitle: 'variant title'
  }
configuration = {orgName: 'Concierge'}
<ConciergeBackinStockForm
  options={options}
  configuration={configuration}
/>
We provide one component that can be easily configured to the most common use cases.
1) Inline form:
Just use use the component right where you needed.
<ConciergeBackinStockForm options={options} configuration={configuration}/>
2) Dialog
To avoid unnecessary libraries to be packaged, we recommend to include our form component using your dialog implementation/library of preference.
  <YourDialog>
     <ConciergeBackinStockForm options={options} configuration={configuration}/>
  </YourDialog>
Default configuration
Below the back in stock form with no configuration at all (whitelabel). The form will inherit the style used on your site.
Out of the box usage
With some customization
By passing our own configuration object we can overwrite the default configuration
In the next example we can see how we can use the parameters to pass required values and overwrite the configuration at the same time.
Custom
  <ConciergeBackinStockForm
    options={{
      apiKey: 'eyJhbGciOiJIUzI1NiJ9.eyJvcmdfaWQiOjgxLCJvcmlnaW4iOiJodHRwczovL3d3dy5jYWN0aWxpY2lvLnVzIn0.dAbeoicGWKesbRrmQRCwYHevNm0IR50L1eeCVJKDWNU',
      mode: 'test',
      productNo: 999999,
      variantNo: 899988,
      productLink: 'https://yourstore.com/the-product',
      productTitle: 'The Product',
      acceptsMarketing: false,
      platform: 'klaviyo',
      shopifyDomain: 'succulentcity.myshopify.com',
      variantTitle: 'Blue'
    }}
    configuration={{orgName: 'Great Company',
      smsInsiders: false,
      formContainerStyle: {textAlign: 'center'},
      buttonStyle: {
         backgroundColor: '#1d262f',
         color: '#fff',
         marginTop: '5px',
         margin: '5px',
         padding: '5px',
         borderRadius: '10px'
      },
      header: 'Get notified when this item is back in stock.',
      subheader: "We'll send you a text message."
    }}
  />
This how the form with the preceeding cuzotmizatoin will look like
SmsOptIn
Enable customers to subscribe to your SMS distribution list.
How it works
1) Customer will provide his/her number and accept terms and conditions
2) Concierge sends a confirmation message to confirm the phone number
3) Customer replies "JOIN"
4) Afte receiving the reply message, Concierge will add the customer to your opted-in list
5) Concierge sends a welcome message to the customer to confirm the subscription
Prerequisites
In order to use this functionality Concierge requires a corresponding API Key.
Javascript API
Setup
Function signature
REST API
We provide a REST end point with the following signature:
QA/Test mode
POST https://staging.conciergeteam.co/sms_opt_in
Production
POST https://app.conciergeteam.co/sms_opt_in
Remember to adjust your PK depending the environment your are running on (dev,test or prod)
Parameters
required options
Name Description pk Your Public Key. Changes depending on test or prod mode phone_number Customer Phone Number
optional options
Name Description Customer Email first_name Customer First Name last_name Customer Last Name sign_up_preferred_associate Associate ID of the associate we will assign the customers that sign up sign_up_comments Signup comments utm_source utm_source utm_medium utm_medium utm_content utm_content utm_campaign utm_campaign
responses
HTTP CODE Description 200 On Success 403 Invalid PK 422 phone_number or PK is missing
React
Setup
Install the Concierge React sms package from NPM:
Install package
npm install react-concierge-sms
Include the component
import { ConciergeSmsOptIn } from 'react-concierge-sms'
ConciergeSmsOptIn
The React component expose the following API:
<ConciergeSmsOptIn options={options} configuration={configuration}/>
options
Name Description pk Your Public Key. Changes depending on test or prod mode mode dev, test or prod. prod is used by default
Additionally you can use the following optional attributes to pass in some metadata to help you track your campaigns.
aditional optionsThis metadata will get attached onto your customer metadata
Name sign_up_comments utm_source utm_medium utm_content utm_campaign
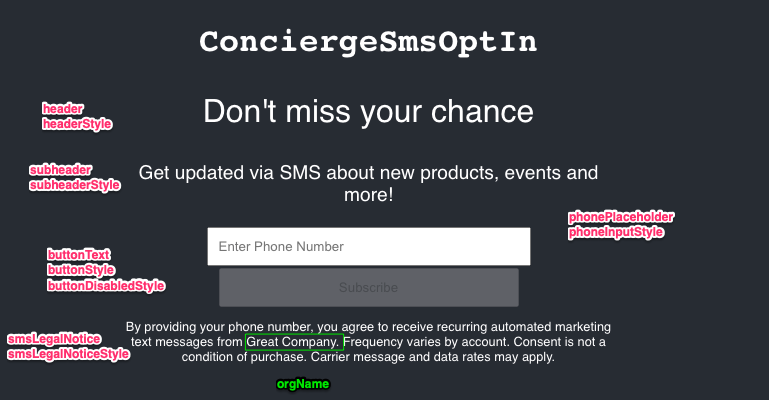
configurationorgName: *required*, header: "Don't miss your chance", subheader: "Get updated via SMS about new products, events and more!", phonePlaceholder: 'Phone number', buttonText: 'Subscribe', successText: 'Thank you. We have sent you a message to confirm your subscription.', formContainerStyle: {textAlign: 'center', fontFamily: 'Helvetica'}, buttonStyle: {padding: '10px', width: '60%'}, buttonDisabledStyle: {opacity: 0.7, padding: '10px', width: '60%', cursor: 'not-allowed'}, headerStyle: {fontSize: "2rem"}, subheaderStyle: {fontSize: "1.2rem"}, phoneInputStyle: {padding: '10px', width: '60%'}, smsLegalNoticeStyle: {fontSize: "0.8rem"}, smsLegalNotice: "By providing your phone number, you agree to receive recurring automated marketing text messages from {{org_name}}. Frequency varies by account. Consent is not a condition of purchase. Carrier message and data rates may apply.", onSuccess: () => {}, onError: (error) => {console.error(error)},
This is the default configuration; You can overwrite an existing configuration by passing an attribute with the same name on the configuration object.
For attributes referring to an element style (e.g buttonStyle) pass any value accepted for React's style
Configurable elements
Style names should be specified with an object whose key is the camelCased version of the style name
orgName is required. Make sure to update it with your organization/company name.
Basic use
<ConciergeSmsOptIn
  options={{ pk: API_KEY}}
  configuration={configuration}
/>
We provide one example component that can be easily configured for the most common use case.
1) Inline form:
Use the component wherever you need it.
<ConciergeSmsOptIn options={options} configuration={configuration}/>
2) Dialog
To avoid packaging unnecessary libraries, we recommend including a form component in your preferred dialog.
  <YourDialog>
     <ConciergeSmsOptIn options={options} configuration={configuration}/>
  </YourDialog>
Default configuration
Here is a whitelabel back in stock form with no configuration. The form will inherit the styles used on your site.
Out of the box usage


